I've been wanting a hat stand for quite a while, but I have never been able to find one. So the other day I showed my Mom a picture in a book of what I was talking about and asked her if she thought we could come up with something similar. Of course, my Mom being the genius that she is, knew right away how to do it! So I thought you all might like to see how we made ours. It's nothing super fancy or anything-we used what we had around the house with the exception of the dowel, but I'm really happy with how they turned out :-)
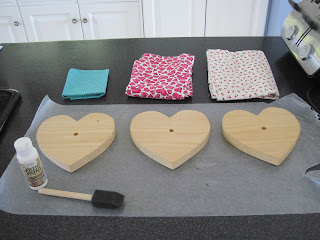
First, Mom found some wooden hearts my Grandpa - we called him Atta (it's Finnish) - had cut out for her years ago. He used to be a carpenter so he always had things like these on hand and loved making things for my Mom and all us grandchildren. He has since passed away, so using these hearts for the bases of my hat stands makes them extra special to me. They already had holes drilled in them so Mom went to the store and bought a dowel that would fit snugly inside. We sawed the dowel into pieces that were the height I wanted, making sure to add extra length to make up for the parts that go into the base and the top.
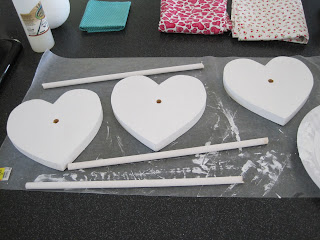
I gave them a couple of coats of white paint - this kind was patio paint for wood, so it didn't need to be varnished or anything. There wasn't a lot left in the bottle, so I did my best to give them a nice coating.
I stuck one end of the dowel into the hole in the base and lightly hammered it in to make sure it stayed. Then Mom found some Styrofoam balls that were about the size of a newborn baby's head and I poked a hole in the bottom, added some hot glue, then stuck them onto the other end of the dowel.
After that we took some fabric, cut it into squares that were big enough to cover the balls completely and draped them over top. We took some sewing thread and wrapped and tied it around the "neck" part to secure the fabric in place. (We tried our best to make the fabric lay as smooth as possible, but it did have some overlapping areas. It still looks nice though). To finish off, I cut away the excess fabric.
Ta-da!! And there you have it, a very easy way to make some cute hat stands! They're great for taking photos, especially when you don't happen to have a little baby handy. I also made a bigger one for displaying and photographing adult-sized hats while I was at it.
I'll be back tomorrow to show you how the hats I've been working on this past week look on them :-)
Happy Knitting!!


Very cool! And how creative! :) You should post about this on Ravelry - people are ALWAYS looking for hat stands. :)
ReplyDeleteCute idea! I agree with Rae Lynne! :)
ReplyDeleteThank you Rae Lynne and Suzanne. They were really fun to put together. I wouldn't even know where to post about this on Ravelry!
ReplyDeleteLove it! I have my old blanket I've been wanting to make something out of it and this would be perfect!
ReplyDelete